Tips on how to get DJI GO 4 Ready for Survey Flights
When initially configuring a DJI drone to fly there are some easy rules of thumb to follow with the settings and controls given to the pilot. When trying to configure the drone for a survey flight there are a multitude of settings and icons to look out for when setting up the drone. Then there are the others that don’t “pop” out quite as easily to all pilots but are nonetheless important to know and understand. In order, a pilot should look out for these 4 general tips when first using a DJI drone for survey flights:
System Status
Status Bar Icons
General Settings
Camera Settings
System Status
When opening up the DJI app and going into the camera view of your drone, this will allow you to more easily change and edit any settings that you may want to in regards to conducting a survey flight. The first thing that you will encounter when going into the camera view is the top left corner showing the System Status. Usually this needs a bit to give you the thumbs up to fly as it searches for a GPS signal, but it should be ready to go most of the time prior to flight. When it isn’t ready to go, just clicking the text will pull up the system status menu which will display All the statuses that need to be addressed prior to take off. These settings can include simple configuration settings (like max flight altitude or distance) to needing to do manual calibrations like compass calibrations.
One thing to note with the System Status is that the aircraft can take off with select software or calibrations not done. This, very obviously is not good as sometimes aircharts update or maybe your compass calibration is off by over 20 degrees! It is always important to update prior to leaving to the field to fly as then you aren’t surprised by updates or go out and calibrate your drone to the area you are in prior to the day you need to fly to ensure it is correctly calibrated for that area.
Status Bar
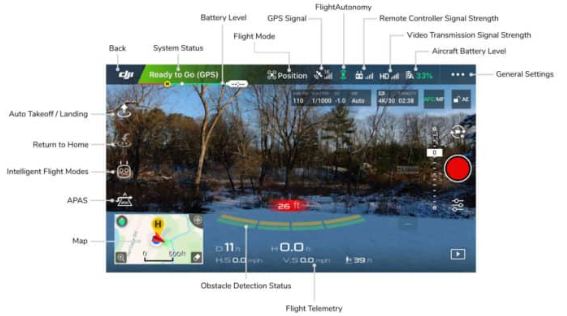
The Status Bar on the top of the camera view gives you an idea of the health and the most general settings that you have on your drone. From left to right these status symbols are read as:
Flight mode: Be sure to have this out of Beginner Mode as this will limit the range of motion and speed of your aircraft!
GPS Signal Strength: This is what it says, the strength of the GPS signal.
Visual Navigation Settings: These settings show the bars on the camera view for when you are nearing an obstacle, not necessary for survey flights, but if using the app regularly then having at least forward and backward signals is recommended.
Controller and Video Signal Strength: These two icons display the strength to the controller and how much quality streaming you have. Selecting either of these status bars will pull up their respective settings for binding in the controllers case to change the quality of video in the video’s case.
Battery Life: If using Botlink’s Capture app this will be directly displayed as well on that app, it is important to note the battery life prior to launch to be sure if you will have to conduct a battery swap mid survey or not.
General Settings: All of the settings we just went through plus some extra.
General Settings:
When going through the General Settings, the best rule of thumb is to go through all of them when you first get a DJI and find out what is or is not necessary with what your operations look like. An example would be recording audio with Video Cache, is it necessary for survey flights? No, but would you maybe want to use it for other commercial flights or other events? Maybe, so always make sure you are aware of your settings prior to launching the aircraft as adding something like sound to your videos can fill up your SD card quicker depending on the size of it.
Camera Settings
The last setting that you may want to mess with is the Camera Settings. These settings are usually good as is and the software that DJI provides will auto adjust the settings to give you better photos. But in the event that it doesn’t adjust correctly, in the camera settings menu to the left of the screen allows you to change between video/photos, adjust focus, aperture, and shutter speed. As well if you are interested in photo formats that aren’t .jpeg or the default image size there are settings to adjust that under the photo settings.
All of these settings together should be able to get you to the point where all you have to do is start up DJI GO 4, wait just 10 seconds for all the signals to update, then swapping over to Botlink’s Capture app to start planning and executing your survey flight with ease.