Completing Your First Flight With Botlink
Your First Flight With Botlink
Pre-Flight Inspection
Thoroughly inspect aircraft for any damage
Check propellers for damage and a secure fit on motors
Manually check that the motors spin freely
Check Camera for damage and remove all gimbal clamps
Install batteries and check for a secure fit
Location
Check that current location is suitable for flight
Check safety section to determine safe flying locations
Place aircraft on a flat stable surface with adequate distance from people and obstructions
Power On
Power on Remote Controller by double pressing and holding RC Power button until RC beeps and the lights turn on. Power on DJI drone by double pressing and holding battery power button until the lights stay on. Always confirm controller, drone, and mobile device batteries are fully charged before each flight.
Note: Do not move drone while powering up. The aircraft calibrates the accelerometers during this phase.
Connect
Open Botlink Capture and select your drone profile. Refer to Setup for more information on creating a new drone profile.
Plug the micro USB connector from the controller into mobile device and tap the Connect button.
Upload a Mission
Select desired site to fly. Refer to Setup for more information on creating a new site. Review flight area and tap the Fly button.
Recheck your surroundings and select altitude as necessary. Once everything is set correctly tap the Confirm button.
Flying
Takeoff
Press and slide the Takeoff button to activate motors and climb to the predetermined survey altitude.
Note: Flying too close to buildings, trees, and other large objects can reduce GPS and Compass accuracy which may result in unexpected flight behavior.
Survey
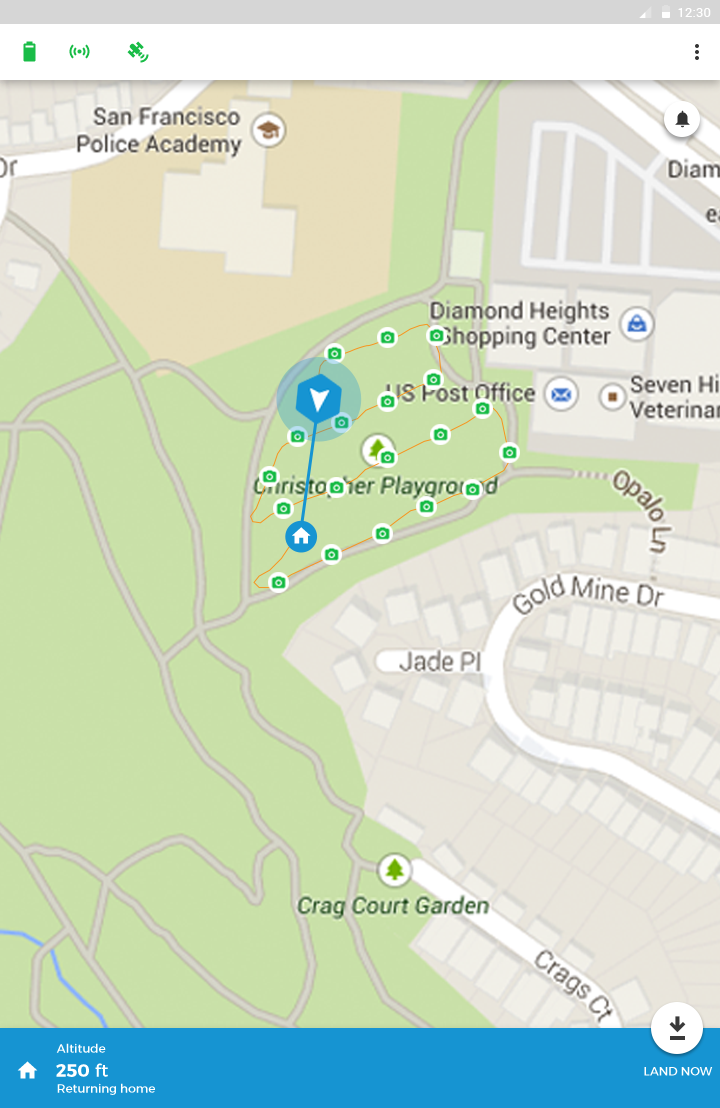
Once takeoff is complete, the drone will proceed to the beginning of the survey. Once it has reached the first point, it will begin capturing images at predetermined intervals until survey is complete. Upon completion of mission, the drone will return to its takeoff point.
Landing
Upon mission completion the drone will automatically return to its initial takeoff point. Wait until the motors have completely stopped spinning to approach drone.
Tapping on the Home button at any time will cause drone to return to its launch location and land. Drone will also initiate Return to Home autonomously in the event of low battery or loss of connection with the controller.
Press and slide the Land Now button while drone is returning home to tell the aircraft to land straight down from its current position.
Pause/Play
Pressing Pause will make the drone hover at its current position until further input. Press the Play button to resume your current mission.
Status Bar
Be sure to monitor the status bar at the top of the screen for enhanced situational awareness.
Battery Level
Displays battery's charge. The color will change from green to red depending on the battery's level.
Connection Strength
Displays connection strength between the controller and the drone.
GPS
Displays current GPS health.
Post Flight
Power Down
To power down your drone, double press and hold the battery power button. Once the drone is turned off, power down the controller by double pressing and holding the power button.
Image Upload
Remove Micro SD card from drone and insert into your computer. Go to app.botlink.com and click on the Upload button. Select all images from desired flight and click open. Once your image upload is complete, you may delete images on SD Card and return it to your drone.
Tip: Select all contents of a folder by using keyboard shortcut CTRL+A or CMD+A


